September 08, 2016

Der Workshop-Herbst 2016!


Der Herbst ist genau der richtige Zeitpunkt, um ein paar Nähgrundlagen zu lernen! Dazu passend gibt es bei mir einige Workshops.
Weitere Informationen und Anmeldung per Mail.

8. Oktober: Naht- und Saumgrundlagen


Wie nähe ich feine Stoffe zusammen? Was mache ich, wenn ich bei einem Rock nicht genügend Saumzugabe geben konnte? Und wie nähe ich Kurven oder Ecken richtig aneinander? Es gibt viele Tricks und Kniffe, die das Nähen einfacher machen und für bessere Ergebnisse sorgen. Eine Auswahl finden Sie in diesem Workshop. Für das weiterüben zu Hause gibt es die Anleitungen zum Mitnehmen.

Samstag von 9 Uhr bis 14 Uhr, Dauer: 5 Stunden
Preis: 40€

5. November: Schnitte anpassen


Schnittmuster werden für eine Durchschnittsfigur erstellt – aber wer von uns hat die schon? In diesem Workshop zeige ich, wie man Schnittmuster verlängert und kürzt, über mehrere Größen kopiert und andere Änderungen vornimmt, damit das Stück am Ende gut sitzt. Änderungen lassen sich am Schnittmuster leichter vornehmen als am fertigen Kleidungsstück!

Samstag von 9 Uhr bis 14 Uhr, Dauer: 5 Stunden
Preis: 40€

11. und 12. November: Winterlicher Tischläufer mit Applikationen


Mit Applikationen lassen sich schlichte Schnitte ganz schnell und mühelos aufpeppen. Aber wie funktioniert das eigentlich genau? An einem modernen, winterlichen Tischläufer üben wir das Applizieren – ganz einfach, aber garantiert ein Hingucker!


Freitag von 18 Uhr bis 20:30 Uhr, Dauer: 2,5 Stunden und
Samstag von 9 Uhr bis 14 Uhr, Dauer: 5 Stunden
Preis: 60€

3. Dezember: Reißverschlüsse einnähen ist nicht schwer


Wer hat nicht schon auf einen tollen Hosenschnitt oder ein Kleid verzichtet, weil ein kompliziert aussehender Reißverschluss eingenäht werden sollte? Dabei ist das gar nicht schwer! Ich zeige, wie ein Hosenreißverschluss, ein teilbarer Reißverschluss und ein einseitig verdeckter Reißverschluss eingesetzt werden – dann kann bei der nächsten Hose nichts mehr schief gehen. Neugierig auf nahtverdeckte Reißverschlüsse? Kein Problem, das üben wir auch!

Samstag von 9 Uhr bis 14 Uhr, Dauer: 5 Stunden
Preis: 40€

Weitere Informationen und Anmeldung per Mail.

Kinderworkshops

Habt Ihr auch Lust, mit der Nähmaschine etwas Eigenes zu nähen? In den Herbstferien habt Ihr die Gelegenheit dazu! In zweitägigen Workshops könnt Ihr Euch Euer eigenes Kummermonster nähen!


Termine:

Montag, 17. und Dienstag, 18. Oktober, jeweils von 9 Uhr bis 11:30 Uhr
Montag, 24. und Dienstag, 25. Oktober, jeweils von 9 Uhr bis 11:30 Uhr

Was ihr dazu braucht? Bunte Stoffe, einen Reißverschluss, etwas Näherfahrung, eine Nähmaschine und viel gute Laune!

Kurs für Kinder von 7-10 Jahren. Begleitende Mamas sind gern gesehen, aber keine Voraussetzung für die Teilnahme der Kinder.


Dauer: 2 x 2,5 Stunden, Preis: 40€

Weitere Informationen und Anmeldung per Mail.

February 24, 2016

Buchbesprechung: Color Knitting the Easy Way


Vieles am Stricken fasziniert mich und ganz besonders hat es mir das Stricken mit mehreren Farben angetan. Ich habe dazu zwei Bücher von Melissa Leapman, von denen ich das Erste hier heute vorstelle.

Color Knitting the easy way

Dieses Buch von Leapman stellt zwei Arten mit Farbe zu stricken vor, bei denen man mit nur einer Farbe pro Reihe strickt.

Kapitel Eins: Farben auswählen

Das erste Kapitel des Buches beschäftigt sich mit Farbtheorie, erklärt wie man zwei- und mehrfarbige Farbkombinationen entstehen und worauf man achten muss, um harmonische Zusammenstellungen zu bekommen. Das Kapitel ist nicht besonders umfangreich, bietet aber einen guten Einstieg und erleichtert das Zusammenstellen von Farben für ein Projekt. Ich gestehe, das Zusammenstellen von Farben ist mein schwacher Punkt. Mir hat dieses Kapitel geholfen, sicherer zu werden.

Kapitel Zwei: Streifenmuster

Kapitel Zwei erklärt Grundtechniken beim Stricken von Streifenmuster:
  • Wie geht man mit den losen Enden um?
  • Wie fügt man eine neue Farbe hinzu?
  • Wie führt man die unbenutzte Farbe mit?
  • Wie strickt man grade und ungrade Reihenzahlen bei Streifenmustern?
  • Worauf muss man beim Entwerfen von Strickmustern achten, damit die Streifen harmonisch wirken?
Außerdem stellt Leapman drei Arten von Streifenmustern vor, einfache Streifen, dann Muster, die durch Zunahmen und Abnahmen Wellen ergeben und als dritte Gruppe die tiefergestochenen Muster.
 

 Viel Wert legt die Autorin darauf, Effekte über Textur zu erreichen. So werden viele Muster durch Links- Rechts-Kombinationen richtig interessant wie im Beispiel oben. Für alle drei Arten von Mustern gibt Leapman Beispiele und erklärt wie man sie strickt.


Es folgt eine Mustersammlung, die auf diesen drei Mustergruppen basiert und zwei- und mehrfarbige Strickmuster enthält, denen man oft genug nicht ansieht, dass sie mit nur einer Farbe pro Reihe gestrickt werden. Die Muster sind bunt und spannend und regen an, auch andere Muster in mehreren Farben zu stricken und den Effekt auszuprobieren.


Besonders spannend finde ich die tiefergestochenen Muster. Hier lösen sich die Grenzen auf und das Ganze sieht nicht mehr nach Streifen aus. Leider sind die Muster anstrengend zu stricken - der Effekt ist aber die Arbeit wert.

Auf die Mustersammlung folgen einige Projekte für Erwachsene und Kinder. Als einfaches Einsteigerprojekt gibt es fingerlose Handschuhe im Rippenmuster.

Kapitel Drei: Muster mit abgehobenen Maschen

In Kapitel Drei geht es um Muster, die durch abgehobene Maschen entstehen. Barbara Walker nannte diese Muster Mosaic Knitting, bei Leapman sind es Slip-Stitch-Patterns.


Im Technikteil erklärt die Autorin hier, wie unterschiedlich das gleiche Muster wirkt, wenn es glatt rechts, kraus rechts oder in einer Kombination aus beidem gearbeitet ist. Bei diesen Mustern spielt Textur eine ebenso große Rolle wie bei den Streifenmustern.


Die Mustersammlung enthält Beispiele, die wie komplizierte Einstrickmuster wirken, zwei- und mehrfarbig und definitiv nicht ganz einfach zu stricken. Hier ist Konzentration beim Nachstricken gefragt. Der Effekt ist aber auch hier die Arbeit wert.

Die zum Kapitel gehörigen Projekte bringen diesen Mustertyp toll zur Geltung. Die Muster sind mehrfarbig und richtige Hingucker.

Mein Fazit

Ich hatte bisher mit den Slip-Stitch-Muster und auch mit Streifenmustern nicht besonders viel am Hut. Was mich an diesem Buch besonders fasziniert hat sind die Möglichkeiten, altbekannten Mustern durch das Zufügen von Streifen ganz neue Seiten abgewinnen zu können. Die Projekte sind für mich nicht interessant, aber die Mustersammlung ist ein Goldschatz. Auch die Tipps zum Gestalten mit Streifen sind für mich sehr wertvoll. Also - ein guter Kauf für jeden, der tiefer in das Stricken mit verschiedenen Farben einsteigen möchte und sich noch nicht sicher ist, ob er mehrere Farben zur gleichen Zeit verarbeiten kann.


August 30, 2015

Life happened

It has been a very long time since I last wrote a post here. Life has happened and it wasn't pretty.

For nearly three years now, I am battling depression and bipolar disorder. I have been very ill, thinking about ending my life to make things better for my family, for I thought I was nothing but a burden for them. Whenever it seemed like there was a light to see, something happened to extinct it. I would get ill, one of the kids would have an accident or there would be problems with my husband.
I suffered acute hearing loss, the flu (the REAL flu), migraine attacks and other ailments.

But I fought. I'm on a medication (though not on enough of it). I have therapy and work on a healthy life style. I have found friends and left friends behind that weren't good for me. My main helper has been my husband without whose patience and love I would not have succeeded, although sometimes I thought he made things worse. He did not.

A few weeks ago now I had a change in medication and I'm starting to feel better now. There is some energy coming back to me and it's not manic, but positive, true, energy. I'm looking forward to start working again, teaching people to sew and to knit.

And I'm looking forward to pick up the trail in this blog again. I have so many new books to talk about, new techniques I tried. I hope you'll read me very soon!

May 16, 2013

Knit to learn

Last fall I became a member of a great knitting community, the Knitting Guild Association (TKGA). I did this to be able to become... a master knitter.
The TKGA offers the so-called "Master Program", a knitting program in three levels that makes the participant enhance theirs knitting skills by themselves, knitting several swatches using different techniques. Every technique has to be researched and questions have to be answered about it.

Right now, I'm in the middle of Level 1, have knit about 2/3 of the swatches and have learned lots already. All the little things that bugged me (or not) about my knitting for years. I have learned
  • To cast off without this ugly elongated stitch at the end of the row
  • How to get better, evener tension in stockinette stitch
  • Getting a cast on and a cast off that match in tension
  • About differences in tension in stockinette, garter stitch and seed stitch
Some more adventures are yet before me and I'm very much looking forward to it. I'm planning to blog some more about what I'm doing here.

October 16, 2012

Knitting Library Review

Several new knitting books recently moved into the Casa Haifischhappen recently. One by one I will review them here. This is the first one:

The Principles of Knitting. Methods and Techniques of Hand Knitting
Author: June Hemmons Hiatt
2nd edition, February 2012


The Principles of Knitting


When I bought this book, I knew it must be quite a compendium, but little did I know what kind of compendium it would be. It’s the most comprehensive book about knitting techniques I have come across yet. One of my teacher at the Fachhochschule once said said, a handbook about a topic is a book that cannot, by any means, be carried in one hand. And this is absolutely true about this book. On about 700 pages Hiatt gives a thorough overview about and detailed instructions for knitting, planning projects and caring for the knits.


Divided into eight chapters the author covers topics from basic techniques as casting on and off, shaping, stitches and decreases over special fabrics such as double fabric or twining to the importance of gauge, discussion of fibres and how to work on a fabric. The chapter about measurements, gauge and schematics is one of the best I’ve yet come across.

All techniques are thoroughly described in written word and accompanied by concise drawings showing the main steps. So whether you learn better by reading or by looking at pictures, both is equally possible.
I like very much, that not so common techniques like twining or double fabric are described as well as “everyday techniques” as k2tog and ssk.

There are some drawbacks, though.

One thing is the cross-references. I personally like if things are cross-referenced. But Hiatt doesn’t give page numbers. So to find the reference, the reader has to keep his current page, go to the index, find the reference page and go there, to read the correspondent article – which might contain another cross-reference. With the weight of the book, this is quite uncomfortable reading.

The second is that Ms. Hiatt invents her own names for some techniques. Would you know what a Half-Hitch-Cast-On might be? Sounds interesting, doesn’t it? It’s commonly known as Long-Tail-Cast-On. Yes, knitting is notorious for its inconsequence in naming certain techniques. But some things have names that are commonly used and using a different name for a technique widely known makes it hard to find information when one really needs it.


The Principles of Knitting

Conclusion: This is an excellent reference book I think every knitter should own. The information given is excellently researched and edited. I have personally learned a lot about the Half-Hitch-Cast-On I didn’t know before (e.g. the right and left side of the Long-Tail-Cast-On. I never thought about it), I don’t recommend it for the beginner though, it’s not a book for someone help in learning to knit.

September 03, 2012

Cake recipe

Right now I'm making two beautiful Handsome Winter-Sweaters for my kids in the beautiful Merino Yarn by Pickles.

To knit the sweater, the yarn is held double to create a nice, soft and very warm fabric. When nearly finished with the body for DDs sweater in cocoa brown yarn I found it a bit dull and decided to re-knit it using part of the pink yarn for DSs sweater and make stripes.
Imagin this: Knitting in the round, yarn held double, stripes. Makes four balls of yarn jumping around the sofa and being grabbed at by DS. No fun at all! And then I had a light moment.

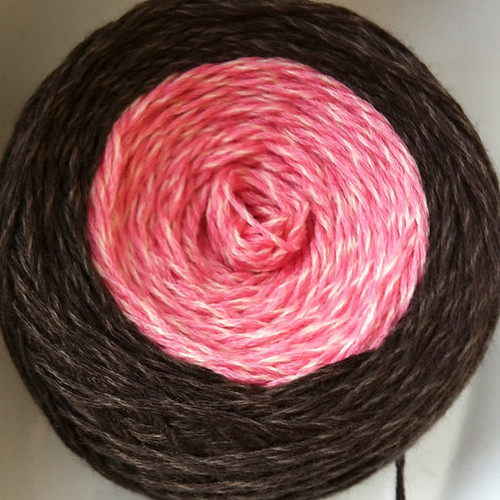
I should wind the two balls of one colour in a cake. It would be much easier to handle. Wait. If I wind anyway, how about winding TWO COLOURS into one cake? Wouldn't that be even better? I tried and it's great! I put the light colour as center-pull to the inside and the darker colour to the outside:


Great idea, isn't it? Yes! But it didn't work! Our sofa, though it's a leather sofa, is covered with sheets to protect it from sticky fingers and inquiring tongues. The pink yarn pulling out the bottom center got stuck in the sheets. I could put the cake on the floor that's tiled, but the sticky fingers would be very quick to tangle and felt the yarn there. I need a yarn bowl.
There are plenty of great ideas on Pinterest about what to use as make-shift yarn bowls but I found the variety of plastic containers proposed to lightweight and to small to hold even one ball of yarn. I read about using tea pots and thread the yarn through the muzzle. As my yarn was already attached to the knitting plus I want to be able to take my knitting with me, that was no option.
But I thought about it a bit and went around the house to see what might work. And I got lucky with the old tableware I inherited from my great-grandparents. It came with a huge lidded bowl with an opening for a spoon. Perfect for stew. Perfect for a makeshift yarn bowl.


It's huge, that's true. But it is also heavy so will have a good stand. And it's smooth on the inside and the yarn rolls off easily from outside as well as from the inside.


We don't use this tableweart as it is not dishwasher safe. I was about to donate it. Happy I am that I didn't have the time yet! I really love the design as well so my new yarn bowl makes me really happy!


August 25, 2012

The fourth birthday


The other week we celebrated DDs fourth birthday with a party. Four of her friends were invited and beforehand the question arose – what can we do to entertain them. And what gift can we give them as a take home present?
Zu meiner Blogliste
I have a severe dislike of these standard bags that include too many sweets and stuff that breaks after three uses or just clutters up the kid’s rooms. So I put some thought into the whole affair. On Pinterest I found a picture of older kids painting pictures during a birthday party (yeah, I didn’t pin it and can’t find it anymore!). We liked the basic idea, but pictures? That would mean getting canvas somewhere and probably no room in the kid’s rooms to hang the pics. What to do?

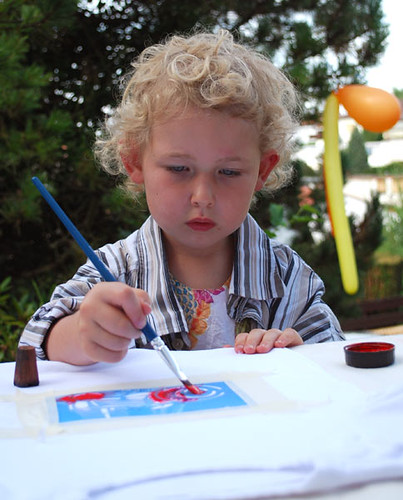
Well, the answer was obvious, kind of. We purchased a number of white basic shirts from H&M and had the kids print and paint these – great fun during the party and a great memory afterwards, a memory the kids actually get to use! I bought long sleeved shirts, so the finished works can be worn during the coming fall and winter!


As I already own a good selection of blueprinting colours, there was very little else to organize: 
  •  Get some throw-away glasses for the colours to put in
  • Organize some smocks for the kids to wear
  • Get out my stamps and the colours
  • Some paint-brushs
The kids were a bit sceptic at first – painting shirts? Hm. How? Why? What? But they paid very good attention and loved the idea quickly.


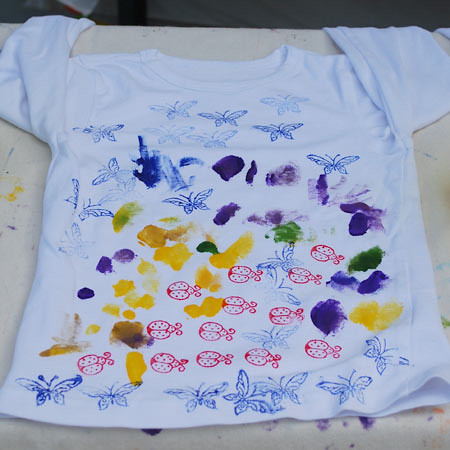
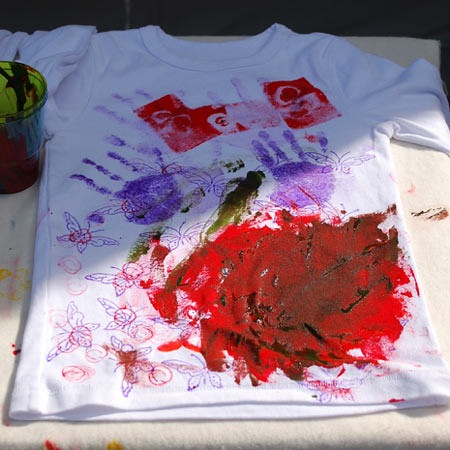
They started out using the stamps and a stencil. Very quickly they decided to use the brushes and paint freely on their shirts. The next step, to print their hands, was a short one.


All five of them were very into it and loved what we had thought up for them. They painted for about 45 minutes in absolute silence and concentration. For me it was a very new experience. I have taught grown-ups how to blue-print. I have printed with DD alone. But I have never worked with a group of little ones. It was a bit of a frenzy sometimes when all of them needed a new colour AT ONCE or wanted to change their stamps. At around four they don’t always get the “First come, first serve” logic we grown-ups are used to.
The really amazing thing about this project was how the shirts show the character of the kids who made them! I don’t know the kids really well, it’s more like we meet at Kindergarten or on the playground. Only one of them is DDs exceptional friend whom we meet often and whose mother I’m friend with.
See the results for yourselves:


 This is DDs. She’s a bit extrovert and searches for rules to help her cope with life.


The kid that made this shirt is a calm and nice little guy, very guarded but when feeling at home he’s super-charming.

The kid that made this shirt I know as quiet and very orderly.

 
The one who made this shirt I know least. She was quite reserved and calm while visiting us, but thawed after some time.

The artist who made this shirt is outspoken, extrovert, a leader. And very down-to-earth.

It was a great experience for me. I think the kids liked it, too. And the parents were amazed at what their kids made. I hope to see some or all of the shirts come fall at Kindergarten.

The colours and stamps used were those of Blauweisschen. They are water-based and not toxic. By simply ironing them afterwards they are fused to the fabric and can be washed with standard laundry.